Fitting new or cleaned silicone milking liners into your shells is a straightforward task, as long as it’s done carefully and correctly. Improper installation can lead to damage, twisting, or poor alignment, all of which may affect milking performance and shorten the working life of your components.
This guide walks you through how to safely and effectively install or replace Silclear silicone liners into your existing shells, and how to remove them when needed.
Why Proper Assembly Matters
Milking liners are one of the most frequently replaced parts in any parlour system, and fitting them correctly ensures:
- Proper vacuum seal and milking efficiency
- Prevention of twisting or stress on the liner
- Longer lifespan of both liners and shells
- Reduced risk of damage during installation
Tools You’ll Need
- Long-nosed pliers (preferably electrical pliers)
- Protective tape (such as tell-tale tape)
- Clean workspace with dry, degreased components
How to Fit Silicone Liners into Shells
Follow these steps to install your new or cleaned Silclear silicone liners:
- Prepare the Pliers – Wrap tell-tale tape or similar around each jaw of the pliers. This helps protect the soft silicone material from sharp metal edges that could tear or nick the liner.
- Insert the Liner into the Shell-Insert the liner into the top opening of the shell. Then insert your pliers into the bottom opening of the shell from the opposite end.
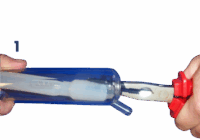
- Grip the Liner Securely – Push the liner onto one jaw of the pliers. Firmly grip it between the two taped jaws of the pliers. (Picture 1- Below)
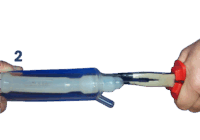
- Pull the Liner Through – With one strong, steady pull, draw the bottom end of the liner through the shell. This positions it correctly inside the casing. (Picture 2 – Below)
- Seat the Liner Notch – Fit the notch of the liner into the designated recess at the bottom of the shell. This helps ensure the liner stays in place during use.
- Fit the Liner Head Over the Shell -Slide the top end of the liner (the head) over the top of the shell. Check that the liner is completely straight and aligned. Twisting can interfere with flow and liner function.
- Attach to the Clawpiece – Connect the liner to a thoroughly degreased spigot on your milking claw. Grease or residue can affect sealing and hygiene.
How to Remove Liners from Shells
When you’re ready to clean or replace liners:
- Detach the liner head from the top of the shell.
- Push the liner notch back through the bottom of the shell.
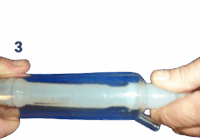
- Gently push the thickened end of the liner back through. (Picture 3- Above)
- Pull out the liner fully from the shell.
Final Tip: Check for Twists
Before each milking, use any built-in alignment guides on the shell (especially if transparent) to confirm that the liner is sitting straight and untwisted. This is vital for even milking and long-term performance.

Need Help or Replacement Parts?
Silclear has been manufacturing precision silicone components for nearly 40 years. Whether you need replacement silicone liners, complete shell assemblies or guidance on fitting and maintenance, we’re here to support you. Call our team on +44 (0)1425 610700, email info@silclear.com or enquire below.
Enquire about Silicone Milking Liners
Fill out the form below and we’ll be in touch to discuss your requirements.
“*” indicates a required field.